How to Add Music in KineMaster (Step-by-Step)
Want to make your videos more engaging? Great audio is the secret sauce. Whether you’re creating content for birthdays, weddings, or YouTube Shorts, KineMaster makes it super easy to add music, voiceovers, and sound effects—even if you’re just starting out.
Let’s break it all down into simple steps so you can get started today.
Why Music Matters in Your Video
Music sets the mood. It tells your story. It grabs attention.
With KineMaster, you can:
- Add background music
- Sync sound effects with visuals
- Record and polish voiceovers
- Let’s dive into how to add music in KineMaster step by step.
Find High-Quality Music and Sound Effects

Before editing, you need the right audio. Here’s where to get it:
- 100% free and copyright-safe
- Download MP3s directly
- Ideal for YouTube and social media
KineMaster Asset Store
Built right into the app
Tons of music, effects, ambient sounds (applause, nature, etc.)
Many options are free or included with premium plans
SoundCloud & Others
- Be careful about copyright
- Only use tracks with explicit permission or Creative Commons licenses
Avoid Spotify. You can’t legally use most Spotify tracks in your videos—even if you download them.
Import Music into KineMaster
Now that you’ve got your music, here’s how to bring it into KineMaster.
From Your Device:
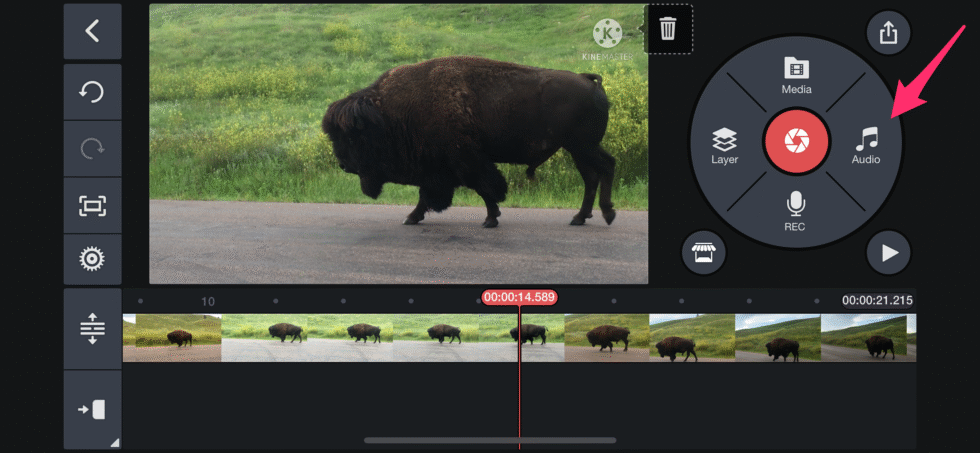
- Open your project.
- Tap the Audio button.
- Browse and select your audio file.
- Tap + to add it to your timeline.
Place and Edit the Music on the Timeline
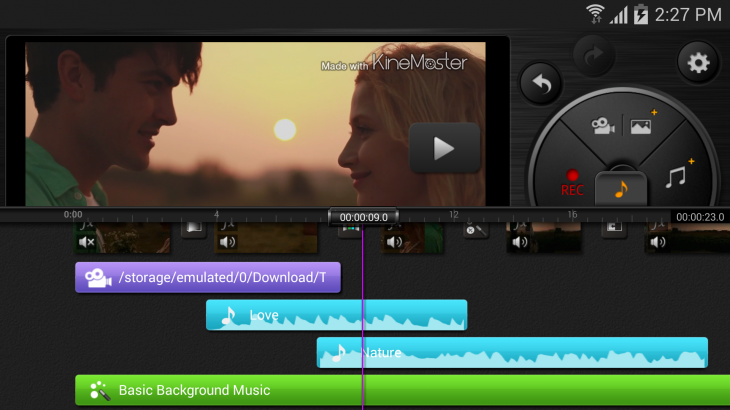
Drag and Drop
- Move your audio where you want it to start.
- Align with your video’s transitions or beats.
Trim & Crop
- Use the split tool to cut audio clips.
- Delete or move sections for precise timing.
Adjust Volume
- Use the volume slider to balance background music, effects, and voiceovers.
- Make sure music doesn’t overpower dialogue.
Record and Add Voiceovers (Optional but Powerful)
Want to narrate your story or explain something?
How to Add Voiceovers:
- Tap the microphone icon in the media panel.
- Press Start to begin recording.
- Tap Stop when done. Your recording is added as an audio layer.
Enhance with Filters:
Add echo, reverb, or reduce background noise using KineMaster’s audio filters.
Fine-Tune Audio for a Professional Touch Use Audio Layers
- Separate your audio elements:
- One layer for music
- One for effects
- One for dialogue
This keeps editing clean and easy.
Sync with Visuals
Use KineMaster’s timeline to line up beats or sound effects with specific visual actions or scene changes.
Use Fade In/Out
Avoid sudden cuts in music. Use fade-ins and fade-outs to keep transitions smooth and natural.
Try the Volume Envelope Tool
This tool lets you:
- Create gradual volume changes
- Emphasize certain parts of a clip
- Avoid jarring shifts in sound levels
Preview and Export Your Video Before exporting:
- Use the preview feature to check how music, voice, and effects sound together.
- Make any final volume or sync adjustments.
- Then:
- Tap Export
- Choose high resolution (at least 1080p) and high bitrate for best quality
- Share your final video!